← Wireless iBeacon Receiver Main Page
Introduction
WiFi-Sniffer is a device that searches for nearby ibeacon information and uploads data to the MQTT server over a wireless network. It can search for all ibeacon information in the vicinity of the radius of 30M, but uploads only 20 ibeacon data to the server at a time. The data read from the server can be analysed and applied to your development. This article is to help you to configure and set up WiFi-Sniffer (Wireless iBeacon Receiver).
Software and hardware preparation
- Install Wi-Fi Starter APP in your cell phone for WIFI connection
- WiFi-Sniffer devices (including power and data lines)
- beacon device
- mosquitto for windows software
Let's go
Install Wi-Fi Starter software
Install Wi-Fi Starter software, it shows as below after installation

Figure1 WiFi Starter App logo showed as above on your cell phone
Power on the device
When you first connect power supply and USB connector to Wi-Fi-Sniffer, you should see red and yellow led blink. Otherwise please check power connection, or change a USB connector. When the yellow led is on, the device prepare for connecting Wi-Fi AP. Configure the Wi-Fi SSID and password by app Wi-Fi Starter. The status is as follows
Figure 2 The green led won’t blink, only red and yellow led blink when it is first powered on.
Use the Wi-Fi Starter software to connect WiFi and detect the devices
- Open app Wi-Fi Starter, type in SSID and password and tap Start.

* Choose the smart config interface* Input your WiFi SSID(click the eye logo can show the input content)* Input your WiFi password* Tap start button to configure
Figure 3
- Wait a moment, the app will receive a notification for device discovering, now Wi-Fi config ok. (Note: Only work with 2.4G Wi-Fi AP)

Figure 4
- The green LED start blink after configure is done. The device upload data to MQTT broker per 10 seconds (default setting)

Figure 5
- Tap the Devices option at the bottom of the Device Configuration interface, you will see the devices which has just been configured. The device name contains its MAC address. Choose the name same as the Mac address sticker on the back of Wi-Fi sniffer, tap it to enter configuration interface.
Eg. Click on the F4B85E03F1EE @ mysimplelink to enter the device configuration interface
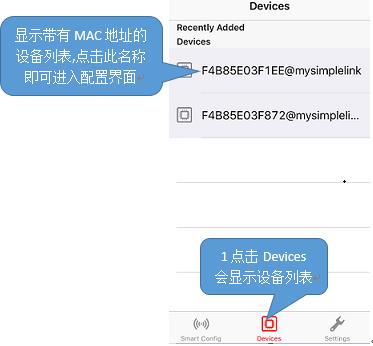
Figure 6 The IP address will be showed on the top of the interface.(which is used for configuration by computer)
- Tap F4B85E03F1EE@mysimplelink device name to enter the configure page for the device

Figure 7
Right now, The Wi-Fi sniffer has connected to WiFi successfully.You can see the overview info of this Wifi Sniffer as showed in Figure 6. We can add more WiFi connection and set up for updating beacons info on next step.
Let’s explain how to configure Wifi sniffer by IP address on computer
Configure WiFi-Sniffer on your computer
- Open the browser in the address bar to enter IP address obtained, you will enter the Overview page the same as Figure 6.

Figure 8
| Fiemware Version | Firmware version for WiFi iBeacon Receiver |
| System Up Time | Device start time |
| Device Mode | working mode |
| MAC Address | MAC address |
| Access Point IP | Access Point IP |
- Go to the Profiles page to add a new WiFi connection

Figure 9
| SSID | The name of the WiFi |
| Security Tpye | Security Type Open\WEP\WPA1\WPA2 |
| Security Key | WiFi Passord |
| Profile Priority | Priority 0 - 7 0 is the highest priority |
After typing all parameters, click Add to submit. You can see all WiFi connections in the following Profiles list. The settings take effect after sniffer restart. The WiFi-Sniffer can work in the wireless environment in the list and upload the beacon information to the MQTT server.You can also remove the wifi setting as you need.

Figure 10
You can also remove the wifi setting as you need.
- Go to the Setup page for beacons data updating

Figure 11
* In System section you can set beacon data update interval, filter beacon name and other parameters.* Auto Update --- Automatic update firmware

Figure 12
* Work Mode ---- upload beacon information format Full Mode / Simple Mode / RAW Mode

Figure 13
* Request Interval ---- Scan interval is default 10s, it can be modified according to your needs 1-10s

Figure 14
* Min RSSI Filter --- Filter the beacon by RSSI value. the default is Default

Figure 15
* iBeacon UUID Filter --- Searches for beacon information for specified UUID and upload.

Figure 16
After the above parameters are modified, click the submit button
2、In the MQTT option you can set your own server
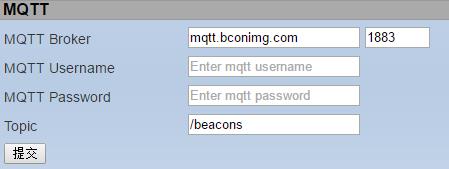
Figure 17
| MQTT Broker | Server name or IP for MQTT broker |
| MQTT Uername | username |
| MQTT Password | password |
| Topic | /beacons |
Click the submit button when the modification is complete.
Read the uploaded beacon information from the MQTT server
Install mosquitto software.
- Open command line mode by cmd
- Change directory to the installation directory of mosquitto
- Enter command to view beacon data
mosquitto_sub.exe -h mqtt.bconimg.com -t "/beacons"

Figure 18
The beacon information format is as follows:
{"id":"F4B85E03F1EE","v":"0.10","mid":5260,"raw_beacons_data":"123B6A1A6E33B5B182C7EAB14988AA99B5C1517008D90001336EC5FFBD;}
This is a set of json data
| id | Mac address for WiFi iBeacon Receiver F4B85E03F1EE |
| v | Firmware version 0.10 |
| mid | The number of times to upload |
| raw_beacons_data | Beacon data information |
Parsing beacon data
| Byte(hexadecimal digit) | description | Example |
| 1 - 12 | Mac address for Beacon | 123B6A1A6E33 |
| 13 - 44 | Beacon UUID | B5B182C7EAB14988AA99B5C1517008D9 |
| 45 - 48 | major | 0001 |
| 49 - 52 | minor | 336E |
| 53, 54 | measured power | C5 |
| 55, 56 | Battery level in percent, FF when battery power is unknown | FF |
| 57, 58 | RSSI | BD |