← ESP Soil Moisture Sensor Main Page
Using Arduino IDE
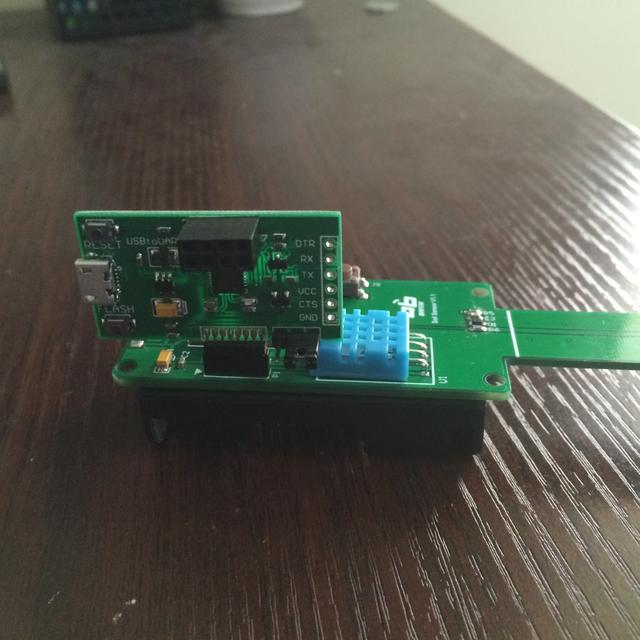
In order to upload code to the ESP8266 and use the serial console, connect any data-capable micro USB cable to ESP8266 Flasher and the other side to your computer's USB port.
Note:
- Please remove the batteries when you upload sketch to the device
- Install the required CP2102 USB driver to have the COM/Serial port appear properly.
See the pictures below

Install the Arduino IDE 1.6.8
Install the ESP8266 Board Package
- Install Arduino 1.6.8 from the Arduino website.
- Start Arduino and open Preferences window.
- Enter http://arduino.esp8266.com/stable/package_esp8266com_index.json into Additional Board Manager URLs field. You can add multiple URLs, separating them with commas.
- Open Boards Manager from Tools > Board menu and install esp8266 platform (and don't forget to select your ESP8266 board from Tools > Board menu after installation).
Setup ESP8266 Support
- When you've restarted, select NodeMCU 1.0 Module from the Tools->Board dropdown
- 80 MHz as the CPU frequency
- 115200 baud upload speed (You can also try faster baud rates, we were able to upload at a blistering 921600 baud but sometimes it fails & you have to retry)
- The matching COM port for your CP2102
Add Libraries Support
- Select Manage Libraries from Sketch -> Include Library
- Search DHT11 and install DHT sensor library
Note: Don't forget to visit esp8266 Arduino project for the latest and greatest in ESP8266 news, software and gossip!
Upload Sketch
The default upload interval is 20 minutes. The sensor will upload sensor data to thingspeak and go to deep sleep mode.
We'll begin with uploading the sketch. Don't forget to get a thingspeak account.
Enter this into the sketch window (and save since you'll have to). You can check the latest code from Github.
#include <ESP8266WiFi.h>
#include "DHT.h"

String apiKey ="<YOUR-API-KEY>";
const char* MY_SSID = "<YOUR-SSID>";
const char* MY_PWD = "<YOUR-PASSWORD>";

const int pin_clk = 5;
const int pin_soil = A0;
const int pin_led = 12;
const int pin_read = 2;
const char* server = "api.thingspeak.com";

DHT dht(pin_read, DHT11);

int sent = 0;

#define SLEEP_TIME 1200 * 1000 * 1000

void setup() {
  Serial.begin(115200);
  dht.begin();

  pinMode(pin_clk, OUTPUT);
  pinMode(pin_soil, INPUT);
  pinMode(pin_led, OUTPUT);
  digitalWrite(pin_led, LOW);
  pinMode(pin_read, INPUT);

  analogWriteFreq(40000);
  analogWrite(pin_clk, 400);
  delay(500);
  connectWifi();
}

void loop() {
  //char buffer[10];
  digitalWrite(pin_led, HIGH);
  delay(500);
  digitalWrite(pin_led, LOW);
  float hum=0,temp=0,soil_hum=0;
  Serial.println("Requesting Temperature and Humidity...");


  hum = dht.readHumidity();
  // Read temperature as Celsius (the default)
  temp = dht.readTemperature();

  delay(1000);
  soil_hum = readSoilVal(8);
  Serial.print("Soil_Humidity:");
  Serial.println(soil_hum);
  delay(1000);

  sendData(hum, temp,soil_hum);
  ESP.deepSleep(SLEEP_TIME, WAKE_RF_DEFAULT);
}

void connectWifi()
{
  Serial.print("Connecting to " + *MY_SSID);
  WiFi.begin(MY_SSID, MY_PWD);
  while (WiFi.status() != WL_CONNECTED) {
      delay(1000);
      Serial.print(".");
  }

  Serial.println("");
  Serial.println("Connected");
  Serial.println("");
}//end connect

// Get average value
float readSoilVal(int n) {
  float valtemp = 0;
  float ValBuf[n];
  int i = 0;
  int j = 0;

  for(i=0;i<n;i++){
    ValBuf[i] = analogRead(pin_soil);
  }

  for(i=0;i<n-1;i++){
    for(j=i+1;j<n;j++){
      if(ValBuf[i]>ValBuf[j]){
        valtemp = ValBuf[i];
        ValBuf[i] = ValBuf[j];
        ValBuf[j] = valtemp;
      }
    }
  }

  valtemp = 0;
  for(i=1;i<n-1;i++){
    valtemp+=ValBuf[i];
  }
  valtemp/=(n-2);
  return valtemp;
}


void sendData(float hum, float temp,float soil_hum) {
   WiFiClient client;

   if (client.connect(server, 80)) { // use ip 184.106.153.149 or api.thingspeak.com
       Serial.println("WiFi Client connected ");

       String postStr = apiKey;
       postStr += "&field1=";
       postStr += String(hum);
       postStr += "&field2=";
       postStr += String(temp);
       postStr += "&field3=";
       postStr += String(soil_hum);
       postStr += "\r\n\r\n";

       client.print("POST /update HTTP/1.1\n");
       client.print("Host: api.thingspeak.com\n");
       client.print("Connection: close\n");
       client.print("X-THINGSPEAKAPIKEY: " + apiKey + "\n");
       client.print("Content-Type: application/x-www-form-urlencoded\n");
       client.print("Content-Length: ");
       client.print(postStr.length());
       client.print("\n\n");
       client.print(postStr);
       delay(1000);

   }//end if
   sent++;
   client.stop();
}//end send
Don't forget to update
String apiKey ="<YOUR-API-KEY>";
const char* MY_SSID = "<YOUR-SSID>";
const char* MY_PWD = "<YOUR-PASSWORD>";
to your access point and password, then upload the same way: get into bootload mode, then upload code via IDE
Now you can simply upload! The ESP8266 Flasher has built in auto-reset that puts it into bootloading mode automagically.
The sketch will start immediately - you will see the led on a while.
Open up the IDE serial console at 115200 baud to see the connection and webpage printout!